• Skip to primary navigation
  • Skip to main content
  • Skip to primary sidebar
  • Skip to footer
  • Learn
    • Food Photography
    • Food Photography Lighting
    • Food Styling
  • About
    • Media Kit
  • Free Guides
    • Food Photography Equipment Guide
    • Food Photography Tips Beginners Guide To Delicious Photos
    • The Food Photographer’s Guide To Better Composition
    • 3 Photo Essay Tips For Food Bloggers And Our Hunt For The World’s Best Honey
  • Courses

We Eat Together

Food Photography Tips, Technique And Tutorials

  • Food Photography
  • Food Photography Lighting
  • Food Styling
  • Food Photography Guides
Home / Food Photography / Making A GIF For Instagram Animated Food Photography

March 19, 2020

Making A GIF For Instagram Animated Food Photography

Pin97
Share3
Tweet
100 Shares

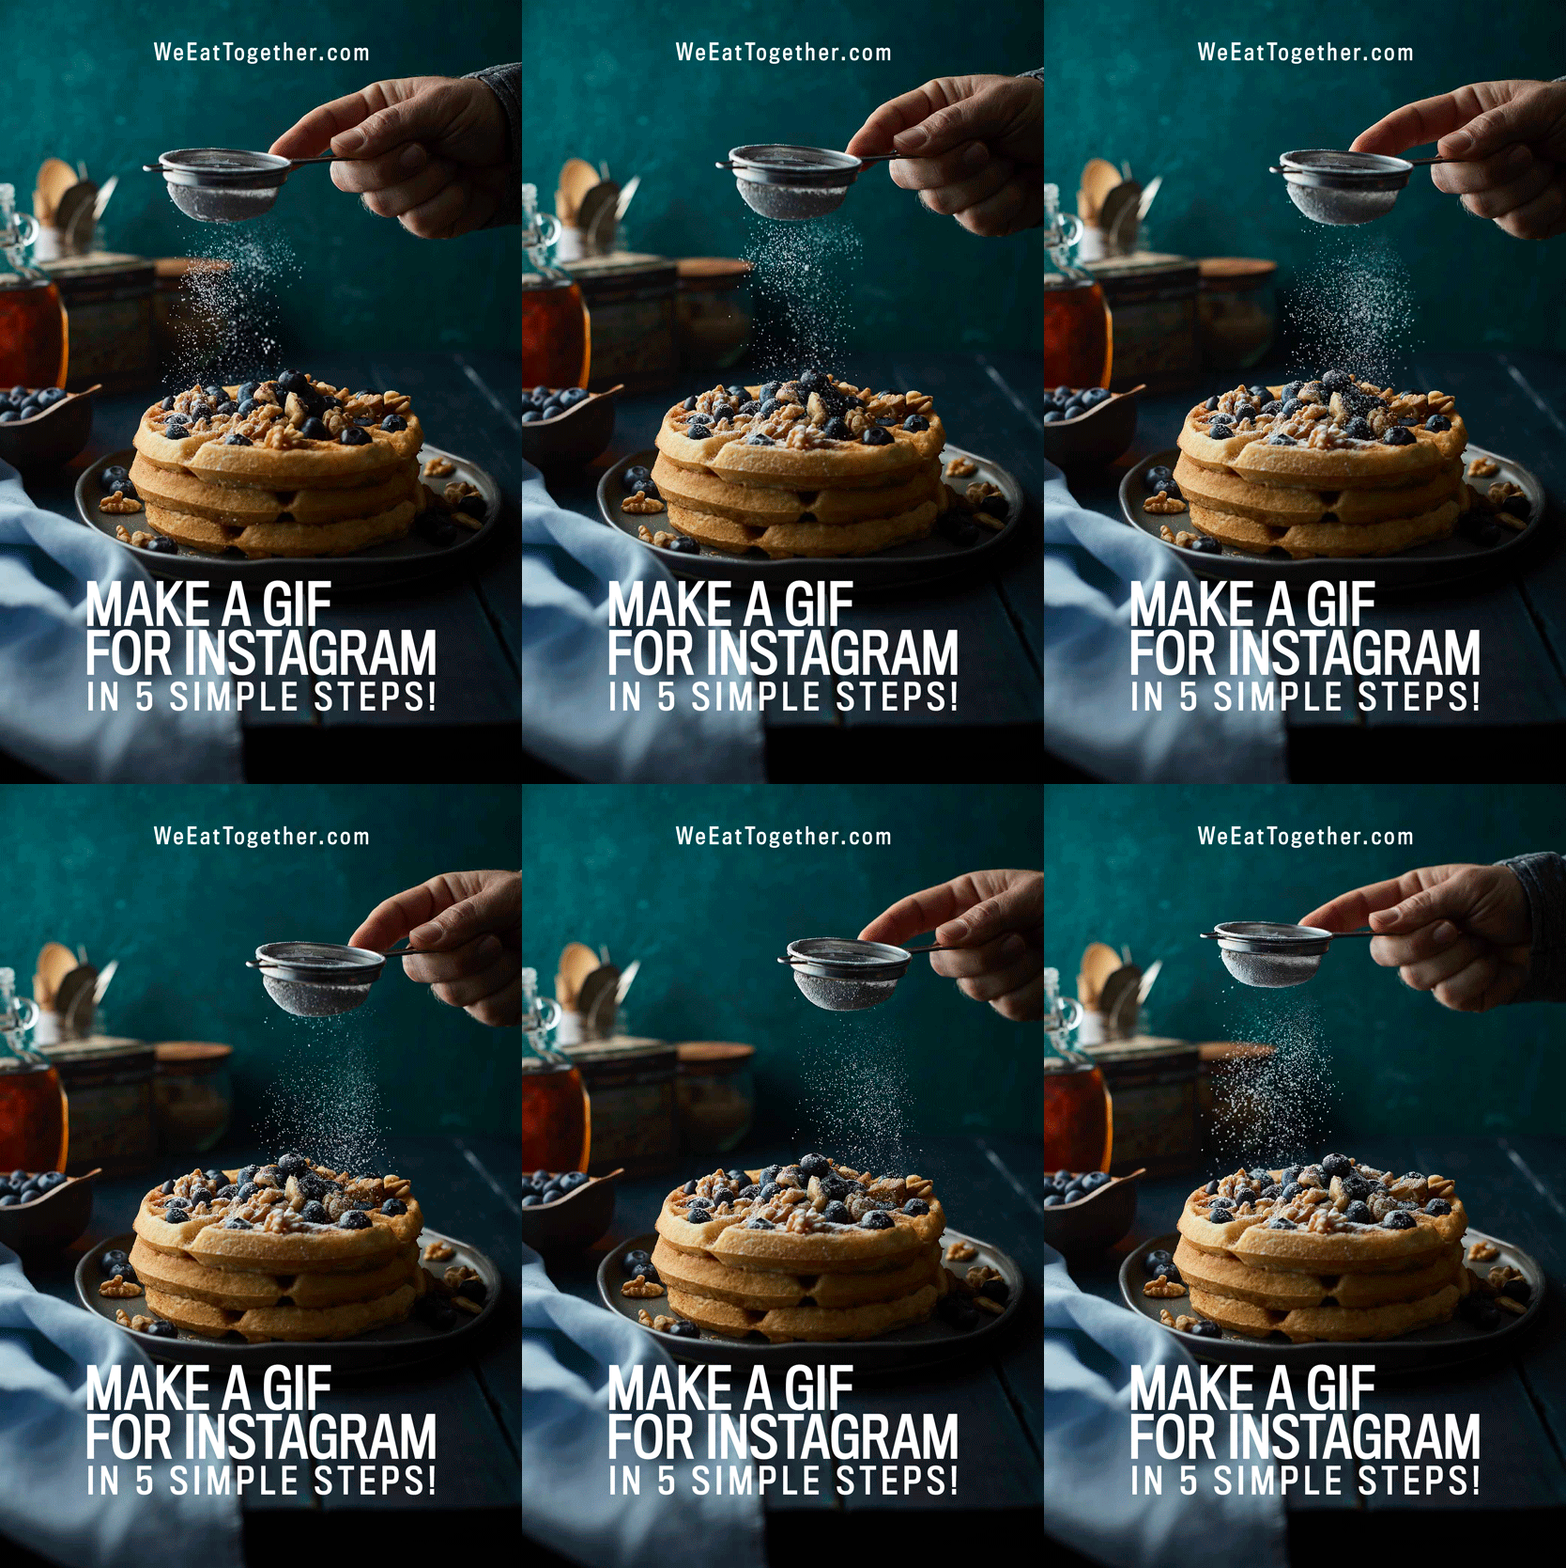
Making a GIF for Instagram is super easy. Scrolling past all the thousands of images and videos in my feed, food gifs always make me pause. You can create your own gif, no matter your skill level. If you have a camera, a tasty subject to photograph, and access to a computer, below you'll find out just how easy creating a gif in Photoshop can be!

Make a gif for Instagram in 5 simple steps using Photoshop

Making A Gif For Instagram in 5 Easy Steps

1. Create or gather your images for the Gif

If you're creating your images for your gif, it's best to place your camera on a tripod especially if you're creating a food gif. A tripod will ensure that only the action you want to animate moves and not the entire scene. Gather all of your images that you'll use to make a gif for Instagram and place them into a folder on your computer or hard drive. 

Watch this video where I show you how to create rocking food gifs. Creating a gif for Instagram could not be easier! Subscribe to my channel HERE for more great food photography content!

2. Load Images For Your Gif Into Photoshop 

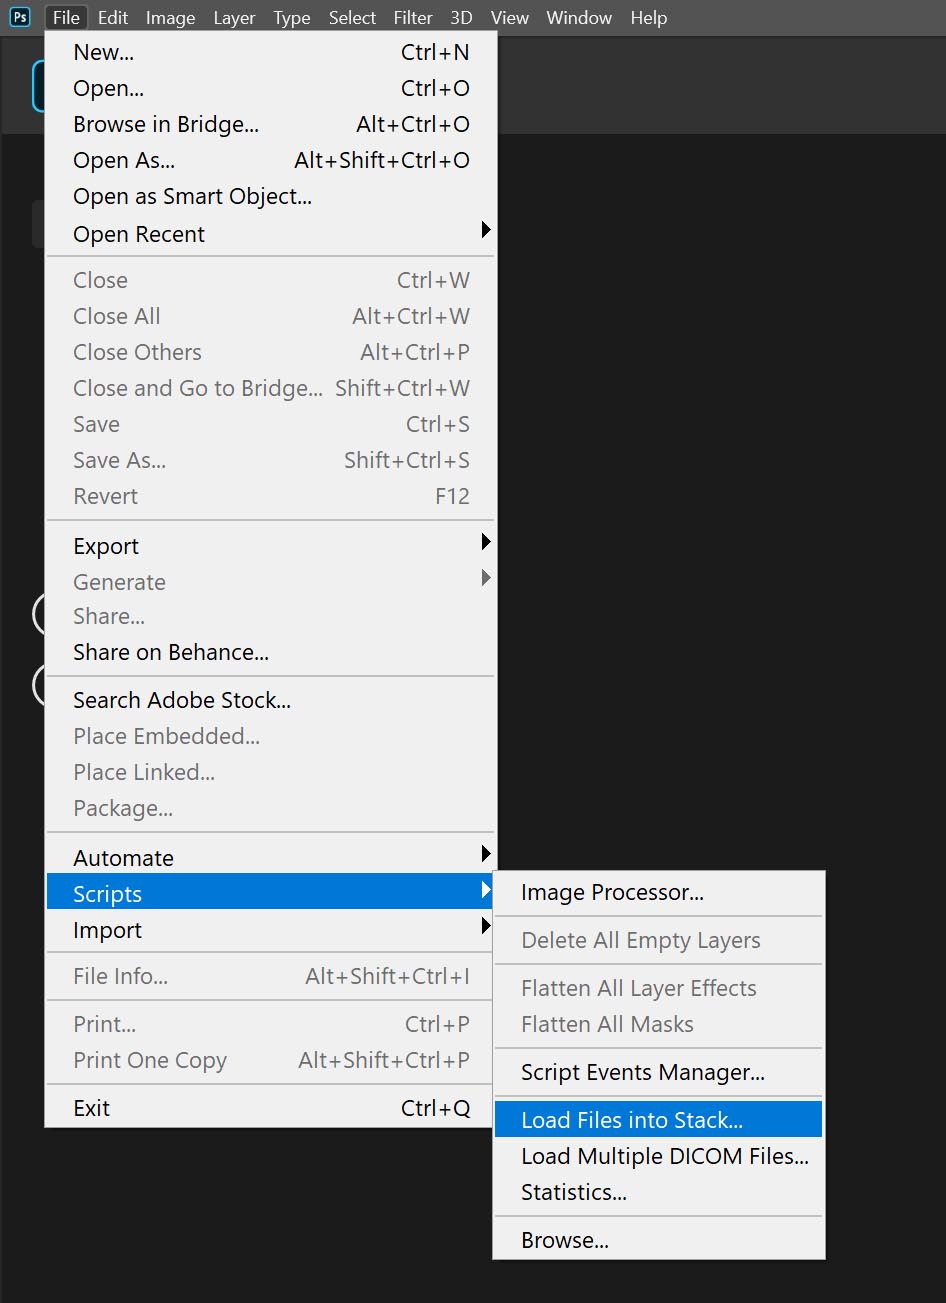
Creating a gif in Photoshop is really easy. Open Photoshop, click on File>Scripts>Load Images Into Stack, choose the option for "folder" and then browse and select the folder containing your images. 

Load Images Into Stack first to create a gif in photoshop
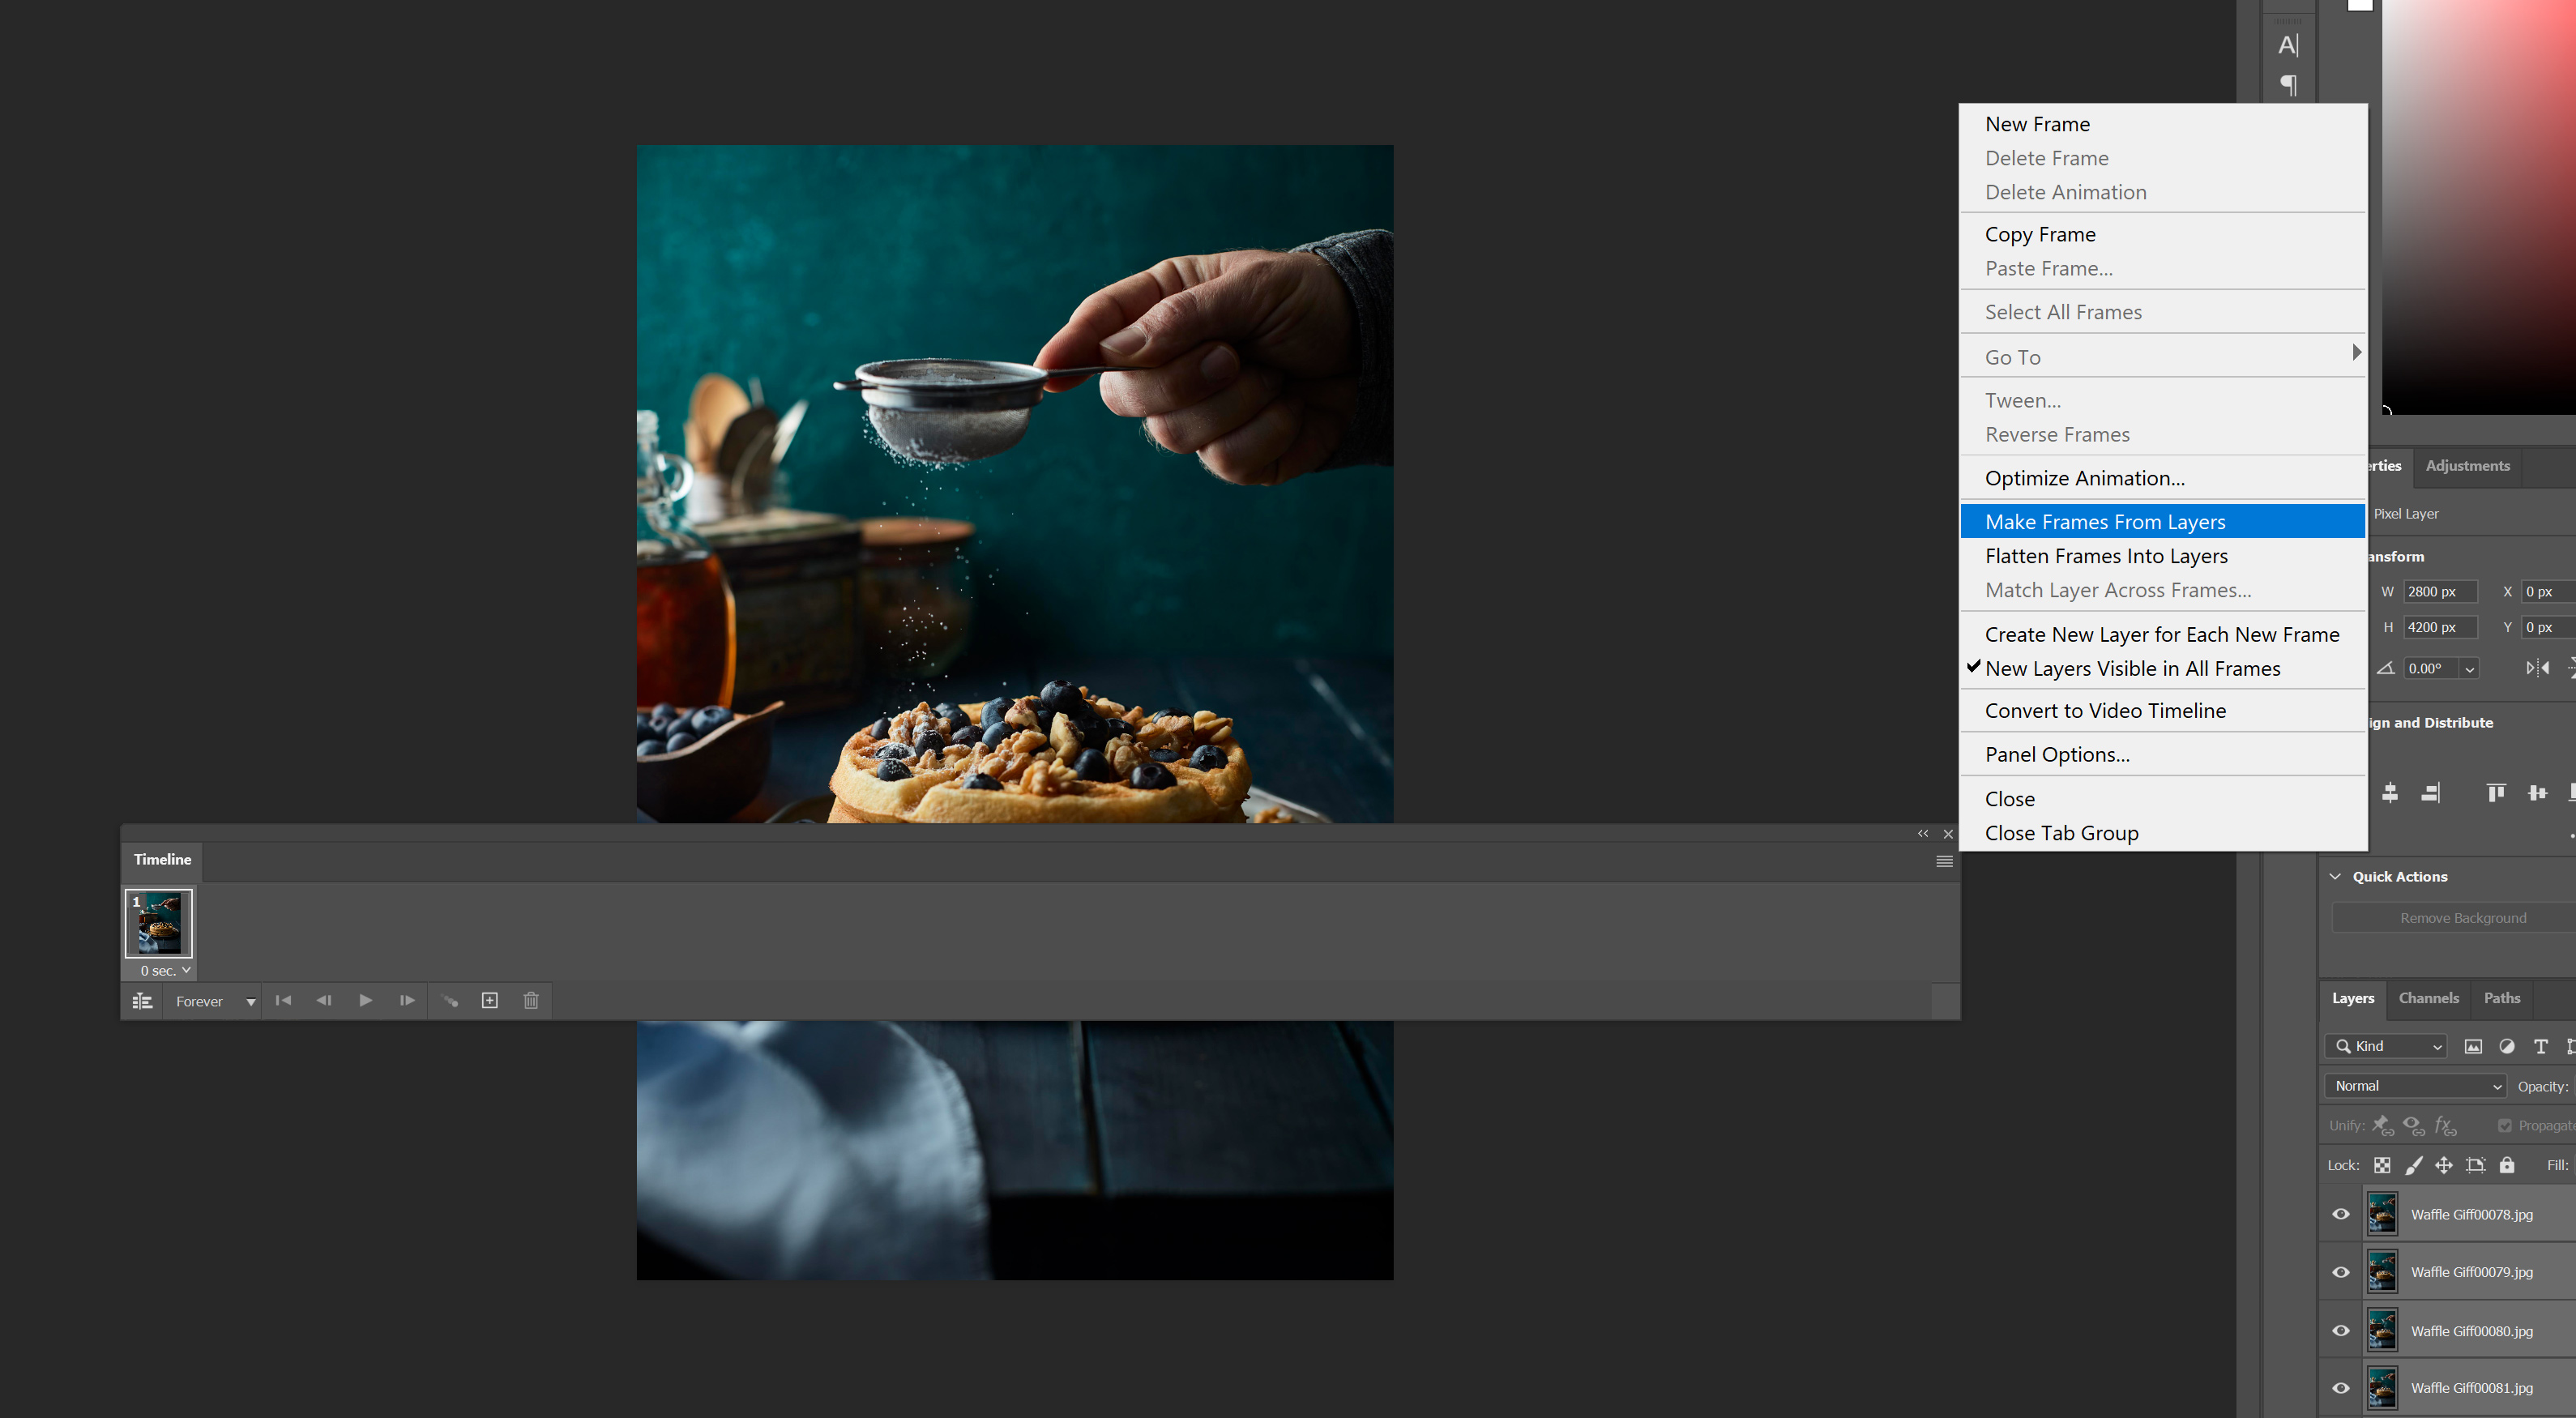
3. Make Frames From Layers 

Once all of your images are loaded onto a single document, each on an individual layer, arrange those layers in the order you want them to appear. The click on Window>Timeline to open the area where you will create the animation. After the timeline window opens, highlight all of your layers and click on Make Frame From Layers, in the upper right hand corner of the Timeline.

Quickly load all of your image layers onto the timeline to create a gif for Instagram
4. COntrol The Look And Feel Of Your Gif 

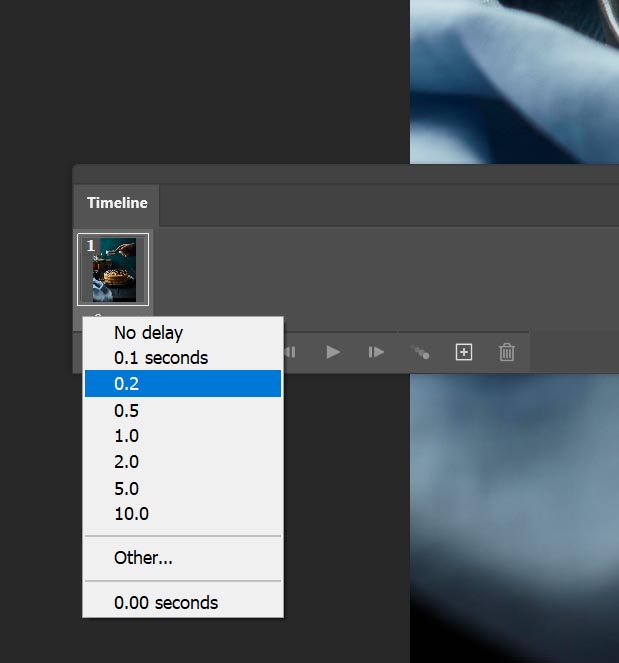
To make a gif for Instagram you'll go through a slightly different process than if you were to make one for the web. Highlight all of your frames on the Timeline. Select your desired delay between frames in the dropdown menu below each frame. This might change depending on how many images you have.  

Photoshop requires you to select a delay between each frame for your gif

In most cases you will want to select No Delay. However as you can see in the video above, I had 18 images in my gif and in order to get around Instagram's mandatory 3 second video minimum, I had to select a delay of 0.2. 

If you only have 2 or 3 images when you're making a gif for instagram you might have to select 1-2 seconds of delay between frames.

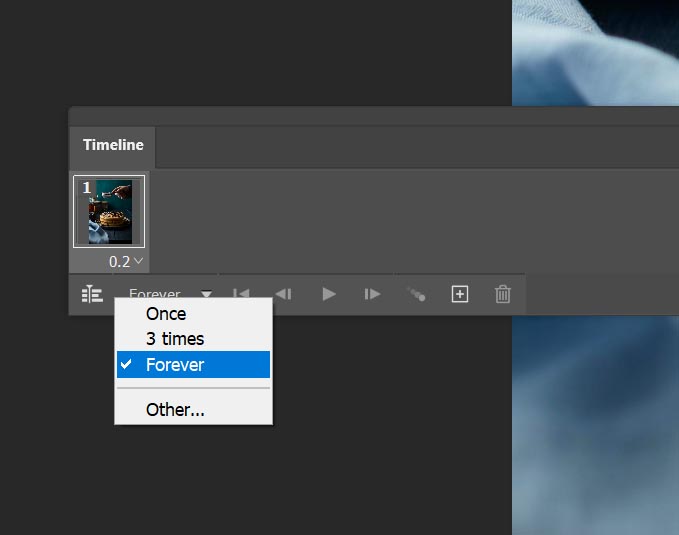
select repeat forever when making a gif for Instagram or the web

Select Repeat Forever in the next dropdown menu. If you are creating a gif for instagram you will have to convert it into a video file, more on that in the next step. Although Instagram places videos on repeat automatically, when it comes to selecting a play option on the timeline inside of Photoshop, I like to select Forever. 

In most cases, I'm creating a food gif for my blog and Instagram at the same time and I definitely want the gif to repeat forever on the web.

5. Export Your Gif From Photoshop 

Exporting is the last step for creating a gif in photoshop, however it can be done in two separate ways. The method you choose depends on where you plan to display it for the world to see.

You can click on File>Save For Web>Save Gif to place it anywhere on the internet, like your blog.

However, if you want to make a gif for Instagram, you will have to export it another way. 

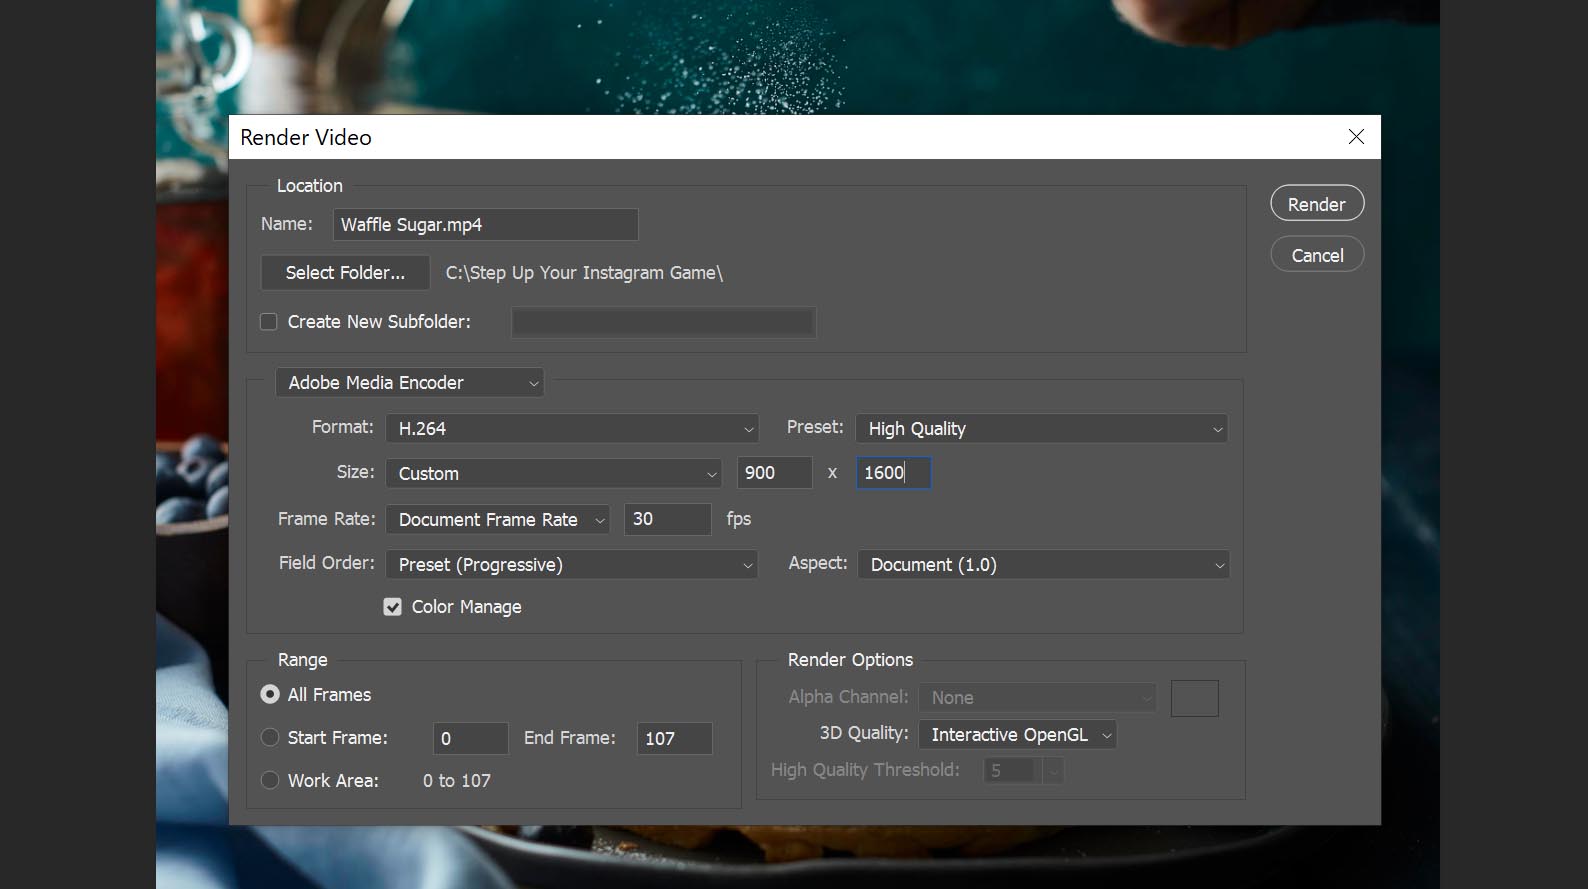
Before saving, click on Convert To Video Timeline in the lower lefthand corner of the timeline. Then select the Render Video button, again located in the lower left.

Choose the H.264 format and resize your frame to match the orientation of your images.

Instagram does not accept .gif files, this step will create a .mov file from your animation, which is suitable for Instagram. 

Saving a gif for Instagram requires you to export the gif as a video file

In the area for Size, resize your video to match the orientation of your gif. For the gif I created on this page and in the video above, I sized the animation 900x1600 to match my vertical image orientation. 

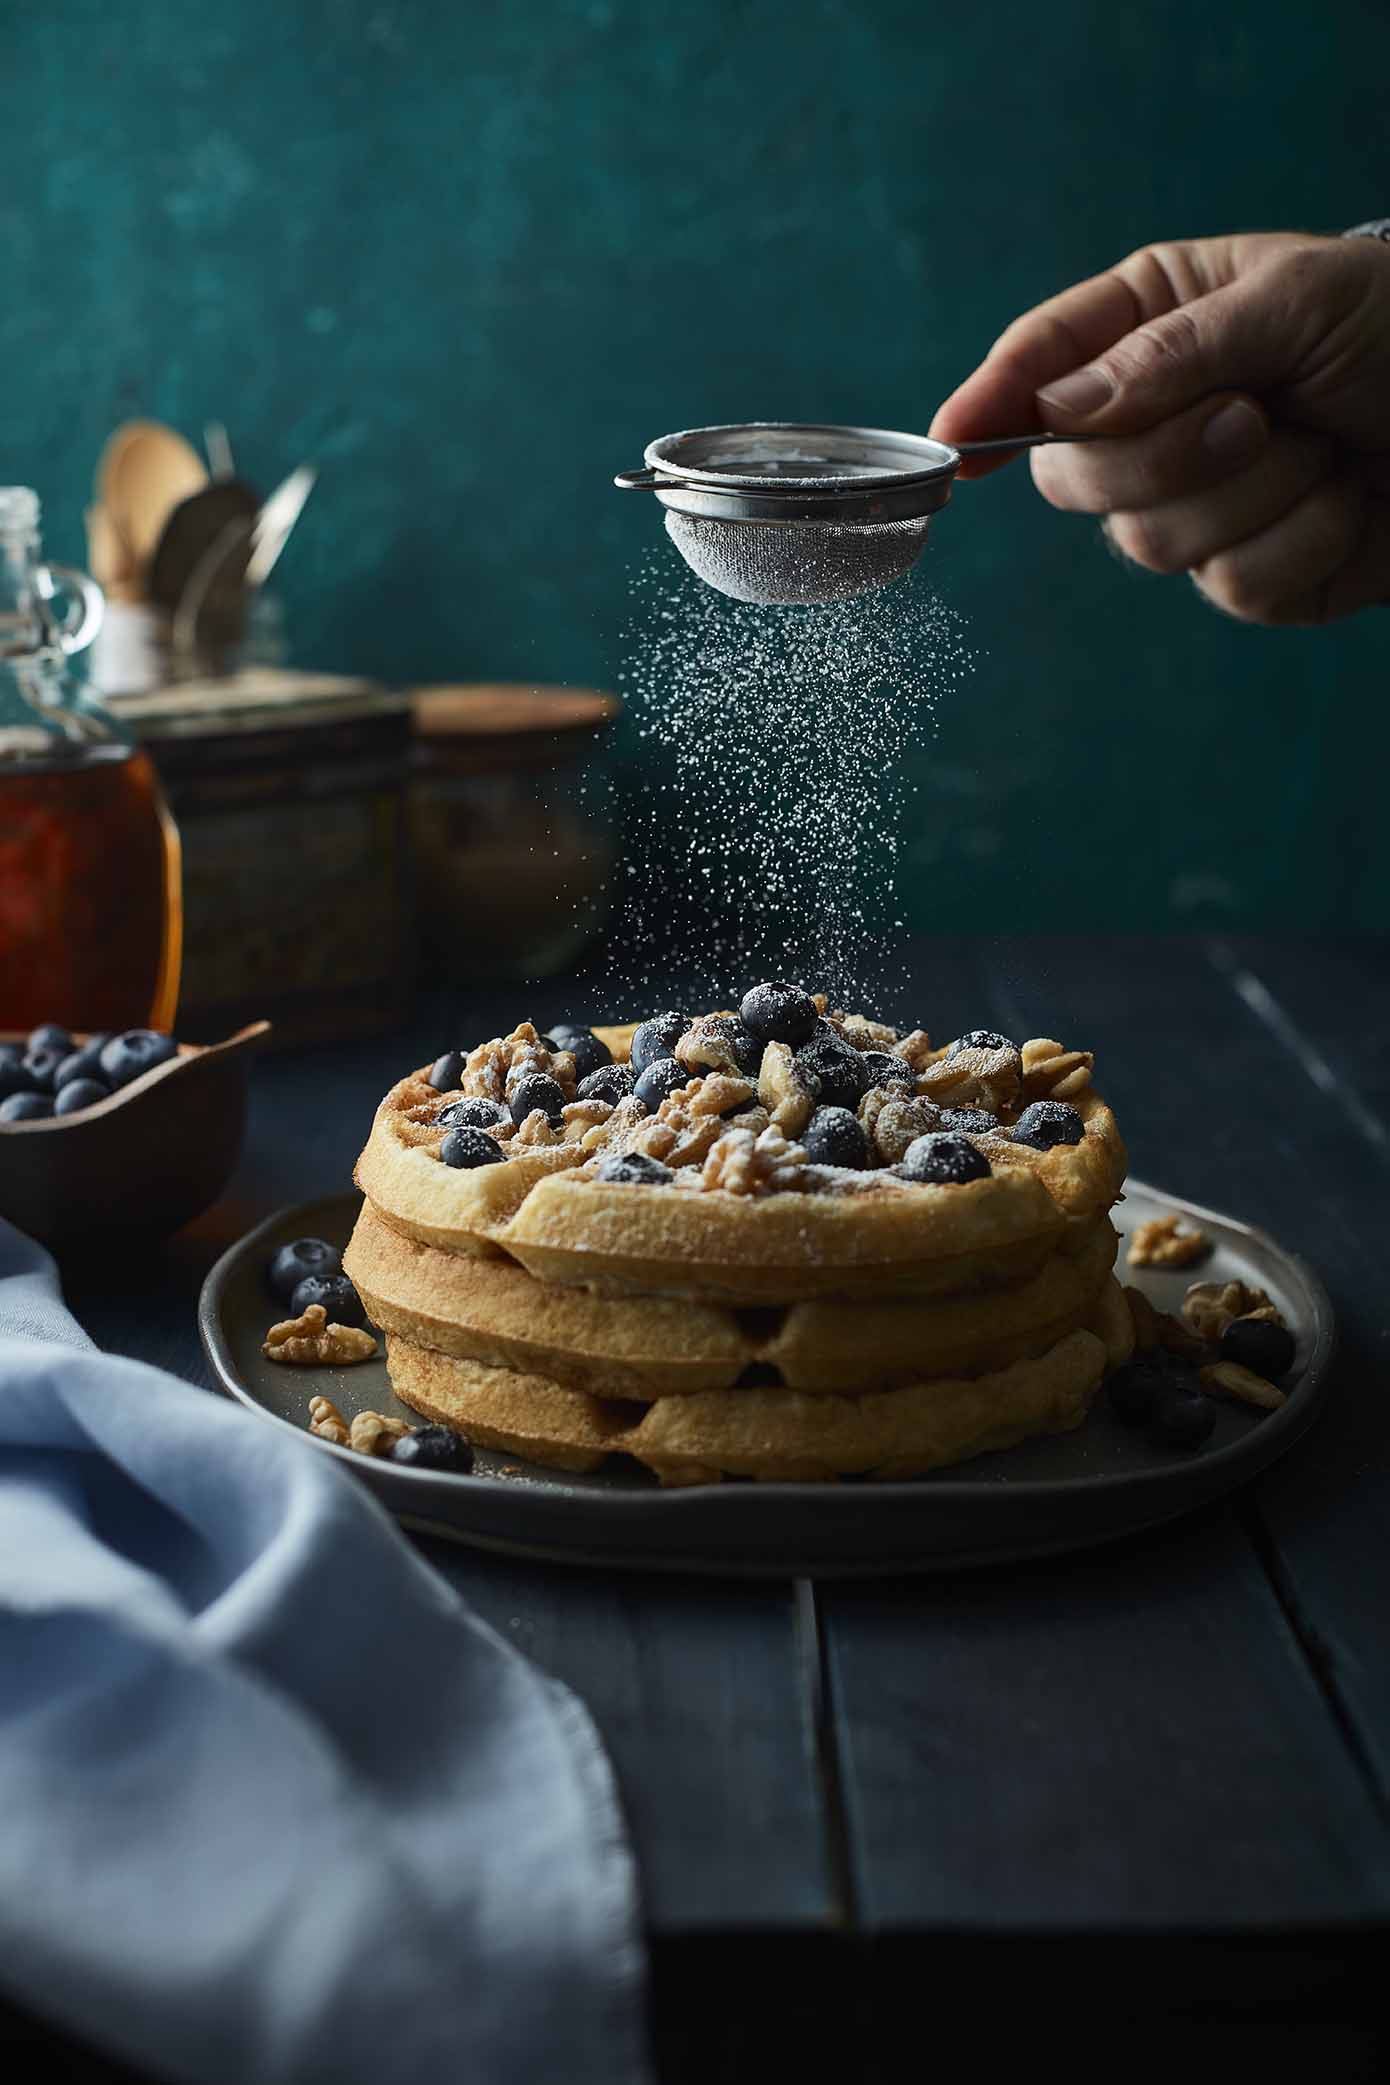
One of the waffle images with powdered sugar falling that I used to create a gif for Instagram

Improve your food photography for when it's time to make a gif for Instagram with these great articles and courses below!
  • Brand New 35 Lightroom Food Presets that you can use on your smartphone
  • 7 Amazing Tips For Perfect Flat Lay Photography
  • The Beginner's Guide to Great Food Photography
  • Lightroom For Food Photographers Course And Preset Bundle
  • Next Level Constant Lighting For Food Photography And Recipe Videos
Pin97
Share3
Tweet
100 Shares

Google+ Comments

Filed Under: Food Photography Tagged With: Food photography tricks, instagram food photography, making a gif for instagram

Primary Sidebar

Hi I'm Skyler!
With over 15 years of traveling North America, Asia and the Middle East, I'm just a camera toting, old school explorer who loves real adventures as much as I love real food. Find More About We Eat Together... HERE!

  • Facebook
  • Instagram
  • Pinterest
  • Twitter
  • YouTube

we.eat.together_

New Video Out TODAY! Last one of the year 🤘Lear New Video Out TODAY! Last one of the year 🤘Learn how to create your own epic food photography backdrops like this one here.

This one is probably my fav. Dark espresso stain. Beautiful with great textures.

Keep rocking it and I’ll see you next year!!
New video out today!! Is this the new best food ph New video out today!! Is this the new best food photography lens? Laowa 24mm Probe Lens from Venus Optics. If you don’t know what it is you have to check it out! Probably my next lens. Merry Christmas and happy holidays to you all 🎄
This IS NOT Real. Probably one of my favorite #foo This IS NOT Real. Probably one of my favorite #foodstyling tricks cause it saves so much 🥃 if you had to pick, what would be your favorite styling trick? What hacks save the day on your shoots?

Canon 5Ds
100mm f2.8L at f8 1/160 ISO100
Elenchrome 500w strobe with large Softbox.
Diffuser + Black card 🤘
This IS NOT Real. Another unbelievable trick photo This IS NOT Real. Another unbelievable trick photographers use to make the food last while shooting. See the behind the scenes video in my profile. 

There are actually two styling hacks going on here and both were probably my favorites as far as giving you the extra time to make the image. 

Those sneaky advertisers! 😜

Canon 5Ds
100mm f2.8L at f8 1/160 ISO100
Elenchrome 500w strobe with large Softbox 
Not for human consumption 😂 but rock on and shoot 🤘
Load More... Follow Me On Instagram
Ad
Ad
Ad
Ad
Ad
  • Facebook
  • Instagram
  • Pinterest
  • Twitter
  • YouTube
Ad
Ad
Ad
Ad

Footer

Pages

About Us

Privacy Policy

Disclosure Policy

Food Photography Masterclass

Lightroom For Food Photographers Course

Advanced Food & Beverage Short Course

Recent Posts

  • Epic Cyber Monday Deals For Food Photographers
  • Printing A Portfolio That Gets You Work
  • Making A GIF For Instagram Animated Food Photography
  • The Complete Photography Bundle 2019 It’s Time To Make Stunning Images!
  • How To Shoot iPhone Food Photography Like A Pro
Ad
Copyright © 2021 Skyler Burt Photography